Sunday, January 27, 2008

Other Main Blades

Some other blades that I flown and liked....

Funkey FG white hollow core 550mm
They were smooth and predictable blades, but because I was only running +/-10 back then, I always thought they were weak and was not loading my engine up enough. Very smooth in flips.

Funkey FG silver 600mm
Smooth blades, but wasn't that fast on the cyclic and the punch was quite weak with the stock raptor pitch window. I am sure they can do better with more pitch, but I didn't had the mechanics to fully exploit its ability when I still had them. Went through quite a few pairs of them and finish was always perfect.
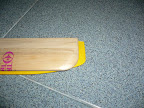
Unforunately..this ugly photo is the only photo I have showing the whole blade...note the shiny new hatori #522, I was already using it back when the JK hatori and MP II was COOL, simply because it was the cheapest of the lot...

The World Models 550mm
EXCEPTIONAL PUNCH AND STRENGTH. Although many flyer who bought the blades later complained that theirs are not tracking and balancing, mine(I assume from first few production runs coz I got them the moment they were introduced) was perfect. It was white in colour and was quite stiff. It made my raptor 30 so good that I could flip at eye level back when I had the raptor 30, something which I wouldn't dare to do with even the raptor 50...with this blade, a tt36, a noisy hatori 222 and pro-glow fuel, it impressed quite a few flyers and I am talking about 60/90 size flyers...


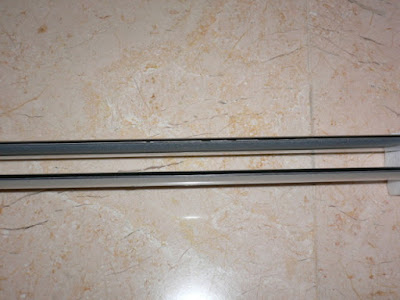
Some unknown Brand CF 550mm I got from the LHS
I suspect its FG, though I was told its CF. The shop assistant who is a pretty good flyer used them also. Never crashed them to know how is construction like. Didn't fly a lot with them either. Worn the gel coating at the root area off and it exposed some black CF pattern, but they still look FG to me.

Friday, January 18, 2008

Linkage Ball screw

While changing the main grips on my raptor, I realised that one of the ball link screws is bent. The previous time I crashed was over a 100flights ago and since that crash, my linkage on the rotor head had never been the same length for the same pitch settings...which means....I have been flying with it for a long long time. So in conclusion, as long as your pitch for both blades are the same as the same stick position, your heli will still fly and track well even if the linkage ball screw is bent and the rod are of different lengths on both sides...

Thursday, January 17, 2008

Cleaning a Thundertiger DV-II carb.

A while back, my tt50 in my plane started having some fuel delivery issue. The rpm was just not peaking, no amount of tuning help. At first I thought the engine was just simply worn out, but after another few flights, the engine started quitting inverted. Adding the baffle back to the muffler helped for another two or so flights, after which, it because impossible to tune. I tried flushing the carb, taking out the carb inlet nipple, a new plug, different fuel, took the engine apart, changed the main needle and idle needle, pretty much everything that can be done, except taking the whole carb apart...at one point, I was running 8turns out on the main needle..

The engine idle with good rpm and could go full throttle upright with absolutely no sign of tuning problem, but once the plane was inverted or verticle, the engine would quit.

Out of desperation, I took the carb apart BY FORCE. I had taken the carb apart a few times, but I always couldn't get out the assembly that holds the main needle. After some thorough study, I realise that the assembly had to be pushed out, not unscrewed or pulled.
How to tear that darn Carb apart??
1. Unscrew the screw that holds the carb rotor in. Basically its the screw in the photo with a big washer.
2. The carb rotor should fall off, take note of the little spring.
Unscrew the Main needle and take out the spring retainer that holds it.
4. Undo this little nut.
5. Push as in the direction as shown in the photo. Don't pull or turn, it doesn't work. Took quite a while to figure out that...BTW, it requires quite a bit of force because there are two rubber o-rings inside holding it, so PUSH.
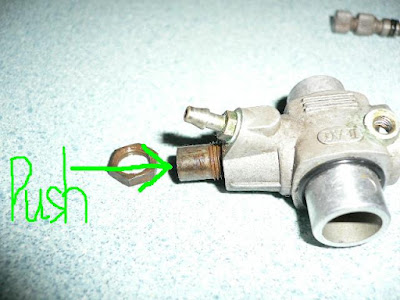
6. DONE! Removal of the inlet nipple is kinda optional, I feel.


The design of the DV-II carb makes it extremely prone to being choked with dust and dirt, which is both good and bad. Good because less dirt enters the engine, bad because it is really troublesome to clean. Because of the design of the two holes as shown in the picture(the other one is on the other side....), no amount of cleaning or flushing of the carb will help if the carb is not completely disassembled. I found two whole balls of dust and fur trapped there. I took my tt36 carb apart and found two lump of similar fur-like dirt, just thinner and smaller. That would explain why my tt36 seemed to be suffering from lack of pressure with the hatori tuned muffler, to think that I thought my pipe was worn out...

Saturday, January 12, 2008

Kasama Mixing level

I have always thought that the raptor was lacking in collective pitch since I started using those Funkey FG blades during my raptor 30 days, partly because those funkey's require a degree or two more pitch to equal the feel of other blades. Flying the raptor with the rotor tech 610mm brought the meaning of "pre-historic dinosaur that is severely lacking in pitch" to a whole new level. There just wasn't enough pitch to load the engine enough and there wasn't enough pop. It was fine for most part of the flight, but in situations when you want to push the heli over like at the top of the slapper, it was lacking a bit of push and the stops at the end of each reversal was lacking...

The solution to this - KASAMA. Yet because of my budget and the fundamental design of the raptor, I couldn't see the reason to put a almost $400 head on this heli when I can sell it and top-up the same amount of money to get a t-rex 600N... So instead of the kasana head, I got just the mixing level. With the help of a flying mate who was doing a mass order on some other stuff, the whole mixing level set only cost $46/inclusive of S&H, which is way lower than the 70 odd my local dealer is asking for...


Note the hole spacing difference between the stock and kasama arm...its this little detail that makes a big change to flight feel...

Installation was a simple screw on task, nothing different from the stock.

I choose to have the ball links on the outer hole of both side for 2 reasons.
1. The outer hole on the shorter side gives a more aggressive setting.
2. The inner hole on the longer side that gives the more aggressive setting will cause the long linkage rod to bind against the thundertiger metal hub at full negative collective pitch. The kasama and gforce head don't suffer from this because the tt hub is squarish and fatter at the top.

With the max servo travel possible...

Stock arm gives...
+/-7 for cyclic and +11/-10 for collective

Inner hole on the shorter side and outer hole on the longer side gives..
+/-7 for cyclic and +/-10 for collective

Outer hole on both side gives...
+/-8.5 for cyclic and +/-13 for collective

I had to lenghten the double link by one complete turn because the kasama arm on the stock recommended length gave +12/-14.

Running +/-12 and 7.5 degree for cyclic transform the raptor into another heli. It was extremely punchy and stops and push overs were much cleaner. Rolls seem faster, cyclic was more sensitive to the sticks, loops were larger, FFF was faster, tic-toc was tighter, rainbows were bigger...everything was so much better than before. With my newly rebuilt hyper @1920rpm, there was absolutely no sign of bogging. The whole thing just felt lighter and quicker. It was so good that I forgot all about flight time and landed when I only had half a header tankful of fuel left...

There is one down side though, somehow hovering seems to be quite a bit more twitchy and touchy, but it isn't an issue for me.

Friday, January 11, 2008

Converting a heli engine into a plank engine....

A plane is never as picky on engine as a heli and when planks are lacking power, the usual approach is not to upgrade the engine to a more powerful one in the class like what heli flyers do. Instead, plankers either down size the plank or up size the engine, either way, it is FUN. As such, even a worn heli engine can make a good plank engine as long as the air frame is of the correct size....

While the heatsink on a heli engine does seem quite a lot bigger, I haven't really found a problem with it on a plane. No issue with cooling(or rather over-cooling) or c.g..

Converting a heli engine to spin a prop is VERY easy. All you need are...

1. A muffler for plane engine, not because the heli one doesn't work, but because it looks ugly with the lump hanging out in the wrong direction due to header direction. For my tt50, I used the tt46 muffler. NO fancy tuned pipe or tuned muffler is required. The cast iron two piece type muffler will work extremely well and is just 1/10 of what shiny heli mufflers cost...

This is how it looks like with a heli muffler...UGLY

This is how a plank muffler looks like on a plane...it goes toward the rear, while a heli exhuast faces sideway...
2. Unforunately, the crankshaft on a heli engine is much shorter, so its almost impossible to use a spinner, so what you need is a prop nut. Its nothing more than a mini spinner that is threaded and act as a stopper nut to secure the prop. Different thread size for different engine. There are two types of material, one being the standard type and the other is the brass type that is a lot heavier and will help a tail heavy plane. Some smaller prop nut like what I am using requires a different starter cone(the rubber piece), not a biggie though...


3. Drive washer set, each engine has its own type of drive washer, available at your LHS for just a few bucks. I believe its called the collet set or something along that line...in any case, as long as a shop stocks spare parts(rings, pistons...etc) for a engine, they will definately have a collect set or washer set for it.

All the stuff required...drive washer set, prop washer and prop nut...


Prop mounted

Thundertiger pro-50h

I got this engine together with the R50 kit a long time ago. Used it for over a hundred flights on a raptor before I upgraded to the hyper and had 2 change of ring and piston in between the hundred plus flights. Once because I broke the con rod in a chicken dance and took out the piston and ring also and the other time because the bearing decided to throw its metal retainer bits. It gives average power, but was frugal on fuel. Not really a lot more powerful than my old tt36, but my tt36 was a power house in the first place and had the same consumption as this engine, so this tt50 really isn't that bad. Furthurmore, the tt36 only made good power on certain fuel and had a NOISY but powerful tuned muffler, so it really isn't fair comparing my 50 to the 30.

The DV-II carb requires the needle mod for ease of tuning and consistency in the lower 75% of throttle. Without the needle mod, idle was too rich and mid-range was too lean. More info on needle mod is available on http://www.runryder.com/. It was a bear to tune before the mod.

The crankcase material is kinda brittle because I chipped a few fins off in a crash, otherwise, I have no complain with this.

I have it in a plank now, spinning a 12.25x3.75 @ over 12000rpm.
Those brown stains are just dirt, not rust...

Monday, January 7, 2008

Honey bee king V2 setup

This king v2 is setup from all the extra electronics that I had. I got this because it was really cheap, $80 for the kit and partly also because it flies real long on a pack that probably can only give a mini-titan 4mins of flight. Since I already have the raptor for throwing around, I don't really need this to be a good performing heli. What I have now in it:

2x gws pico servo & 1x tower pro 9g servo for cyclic, because these came from foamies and I only buy servos in pairs for foamies and I can't squeeze anything larger than those pico servos into the rear servo mounts.

1x gws naro servo for rudder, this is much better than the tower pro servo.

Vision hold heading 2000 gyro, aka robbe 3d gyro, its big and attract lots of attention

gws 6ch rx

align 20A esc and eksy 3800kv motor

Flightpower 1800mah, Polyquest 1800mah, GWS 1300mah

No upgrade on this because I only fly this for kick at the neighbourhood basketball court. Its small and cute, but extremely unstable and unpredictable. Still flyable though. Linkage balls are all plastic and the tail ratio is a bit too low for brushless motor, but for $80, I can't complain much. I got the t-rex canopy because my 1800mah batterys are too big to fit inside the stock canopy and the t-rex canopy looks pretty good too. Using the t-rex tail blades because the stock are simply too small to cope with the brushless. I have only done one flip with this heli and that ended up as a piro flip, probably partly gyro, partly tail ratio issue.

Tried this with a 149dp rx which is a pcm and I found the heli to be a lot more lock in and much more stable, the difference is great even in a basic piro hover. Took it out because I thought it wasn't worth it to risk a $200+ rx in a heli that cost $80.

Friday, January 4, 2008

Align 3D fins

The align T-Rex 600E 3D fins fit the raptor...or so I was told. Well, they do fit, but not without any mod. The screw holes on both fins were a few hair too close to each other so they need to be elongated slightly. Spacers(not included) had to be installed on the vertical fin in order to use the stock fin holder. Its suppose to help in backward flight, but I am not too sure if it really does. It is real light though and my c.g. balance well with these.

Best of all, its CHEAP. Less than 20USD.

Thursday, January 3, 2008

MY Tach Setup

Instead of a fanciful state-of-the-art $200 optical heli tach, I got this tach, because its really a budget tach. Its a Hobbico Mini -Tach for planes. Its suppose to be only accurate to +-100, but what I found is that it actually is accurate to 1, yes, right to that single rpm. A simple test is to just tach your ceiling lamp. It should give you the frequency of your A.C. current supply multiplied by 60. Another test is to match it against governors of known rpm like GV-1.

So is this a CHEAP GOOD tach. No, those two words are oxymorons. The reason why this thing is so god damn accurate and cheap is because:

1. It takes a while to get a stablilsed reading and since plank engines rarely have a stable andconsistent rpm, its never accurate for plank rpm.
2. It need to be close to the spinning blades, i.e. you can't hover it and get someone to tach the heli from far. 30cm is probably near the max.
3. Ample sunlight is required to work its magic and you can't use it under any form of street light or electricity powered lamp, basically, what this means is SUNLIGHT ONLY.

As such, the intelligent(cheapskate) me divised a method to tach the heli with this tach and ZERO additional cost- using your blade holder and lead acid battery. The blade holder holds the tach straight while the 12v battery serves as a weight to keep the tach stable.


What I do is place the heli on the ground with the tach under the rotor disc and switch to idle up in zero pitch and let the governor do its job. I found that rpm to be accurate to the dot but there is a few seconds lag between rpm change and reading change, so you need to wait a few seconds.

Throttle Jockey Pro and Futaba 9254.

I am running a TJ pro because it was a lot cheaper than the Futaba GV-1 and it was the only other option available at the point I bought my governor. The small foot print is a plus point too. I was running the futaba S3001 and then the hitec 325hb on the throttle with this governor. Since I had the S9254 lying around after I sold the Gy502, I installed it in the throttle channel. I am running the Super servo mode which reduces the response time from 20ms to 4ms. While it sounds like an impressive improvement, I didn't really feel any difference. Rpm holding ability is good and it holds as good as my engine will ever allows. The sensor work extremely well and are very durable. I already had like 350flights on the box stock sensor and its still working great.

Requires a tach because there is no rpm read out, but fret not, a cheap airplane tach works with this because once the gov is engaged, it doesn't matter if you are on the ground or tic-toc in the air, the rpm is the same. What this effectively means is that you can tach the heli while its on the ground.

MY TACH SETUP(CLICK HERE)

Its even smaller than a GY502 sensor, so the GV-1 was like a giant to this...

R/C spendings in 2007.

What is the meaning of affordable fun when you don't keep tab on how much you spend...so here it goes...

R/C spending in 2007=$2300, sold Gy502 and GCT620mm= $2300-$180-$50=$2070#

Not a lot, but its quite a chunk for someone who hasn't got a income. Once again, I have prove that good fun can come cheap.

For the past few months...

July-OCT 07=$162 for R50. Nothing went wrong, I didn't crash, made full use of my fuel
reserve.
$290 for Honey Bee King V2. Crashed pretty often and though parts were cheap, crashing twice a week didn't help.
Total=$162+$290=$452

Nov 07 =$264, kinda high because I bought the Rotor Tech 610mm

Dec 07= $455, Sold my GCT 620mm Away for $50, LHS was having a 10% discount sales...so the cheapskate me stocked up on fuel and bought a spare pair of blades. I really do love the RT610mm. Got Regulator and lipo also.=$455-50=$405

Jan 07, thus far=$171. Blame it on the silly engine rebuild. I ordered the parts online from my LHS while they were still having the 10% discount but on holiday...went to the shop to pay on 2nd Jan and they give me the 10%...so...I did save a few dollars.

All above are just heli spending. Plank and plane suck my money too, just not as hard and often.

Update....(26/4/08)

Total amount spent since 1/1/08...about $1500...which is way over what I expected for less than half a year... blame it on the crash I guess. At least I still have 3.5gallons of fuel in the store room which should last me a while..

Update....(21/9/08)

Yet another busy semester...

Blow my budget for the year 2008 BIG TIME.
Buy fuel, buy 90size, buy TX...BUY BUY BUY...planned around 2k on R/C this year...but till now already spent close to 5K. OMG. Will have to stop buying for a while I suppose. At least I still have some fuel. At least I got a part time job during the sch holi to cover a part of it and our dear guardbirdment sponsored a tiny bit because I DEFEND the nation.. And oh yeah...I have total stopped flying planes...so the money comes here.

Spent quite a bit on new ring and piston, new clutch, yet another new ring and piston, yet another new clutch....as for the TX was partly because my old 9C is long over due for replacement and partly because I had a bit of leftover after buying the 700N which was unexpectedly cheap( $810 after I sold the included governor for 55bucks)

Paddles

I am flying on a tight budget, so I really try not to spend on those $50 carbon paddles, although they might be better, but I feel the greenies are good enough for cyclic when combined with the Rotor Tech 610mm and I feel they look darn good, both on the ground and in the air.

So far I have only tried Thundertiger plastic paddles. Why TT and why Plastic? Because their shape are supposed to be good and they are real affordable right from the LHS.

Thundertiger Green Paddles

20g. Transform the raptor into a totally different heli. A big improvement in cyclic, however, I noticed a slight pitch up when doing very fast forward flight. Not too much of an issue to me though. The plastic seems to be a lot softer than the black and white ones and my grub screw holes actually stripped when I overtighten in slightly. Never had this problem with my black or white paddles. To me, they match the yellow dirty Rotor Tech pretty well. Ultimate looking in Kiddyness.


White Paddles

25g paddles. Slightly faster than the black and good for aerobatics. Too slow for 3D flip flop flying. Not a really big difference like the greenies.

Black Paddles
30g. Was too slow for my liking. However, I must admit that I did quite like them when I was flying the 30size.


are 610mm blades really 610mm?

Someone on runryder posted this questions. Are blades exactly the length the manufacturers state how they are? We know that the Thundertiger 600mm is 606mm. So is the rotor tech 610mm really 610mm? Answer is YES.

Comparing with the Thundertiger 600mm stock woodies...bolt hole to bolt hole..


exactly 610mm.

GCT 620mm

Prior to flying the rotor tech 610mm, I was flying the GCT 620mm blades. Gotta admit I was kinda caught up in the "longer is better" hype. These blades came in a nice hard box and were hold apart by two foam spacer. A much better way of blade packaging compared to the funkey method of plastic sheet between blades that I am used to. Supposed to be carbon blades, not sure if its pure CF or just CF reinforced. Narrow cord at 50mm and weights 140g.

They look nice. Black, silver and white top with a silver finish on the bottom. Looks great with the TT green paddles. Came balanced. The leading edge had some imperfection but it flies fine.
Initial Flight Feel
Exceptional climb rate. It had very good punch compared to the Funkey FG blades that I had always been using. Cyclic wasn't fast, but it wasn't too slow either. My heli suddenly climb so well and fast that my loops became so much more larger than it was.
After a Good Amount of Time with These Blades
Initially I thought the bogging on flips and rolls was because of engine tuning because I was still running extremely rich when I first tested these blades. However, my engine never really seemed to regain the power that it had. Later I realised that it was because of this blades. The blades were fine in a climbout even holding 11degree of pitch. It will loop and roll fine. Large open maneuvers like funnel, rolling stall turn, hurricane was all great with this blades. It was only when you do fast and tight maneuvers like tic-tocs that this blades simply cannot catch up with. Overall, I would think it will perform great as a pair of F3C learning blades than 3D flying. One thing I discovered was that despite the constant loading and slight bogging of my engine, my engine actually ran cooler with these blades. Weird, but true. They are great for learning aerobatics, but definately not 3D. Autos are easy with this, not a hell lot of hang time, but it auto way much better than the rotor tech 610mm or Funkey 600mm.
Sold them to one of my flying buddies after a few months of flying with these blades.

OS Hyper

This engine loves to eat bearings for breakfast and piston for lunch. However, unlike my previous Thundertiger engines, I found that having a plug life of 5 or 6 gallons is pretty common. I never really felt that it was a lot more powerful like everyone else is claiming until I upped the headspeed and got the hatori 522 muffler. The 60L carb is really large for an engine this size and it sure drinks for its size. The 330cc tank on my raptor only last for 8mins flat from full to header. Its an amazingly good engine not because its extremely smooth or powerful, but because it just continue to run and idle well no matter how badly it is tuned. It could idle well even when I was just running in pretty rich.

I was getting around 5-6 gallons per rear bearing. I went through 3 piston and rings. First 2 lasted 11gallons each while the third one broke after 5.5gallons.

I recently replaced the ring, piston, cylinder liner and con-rod after the 3rd ring broke. 28gallons wore out my con-rod slightly, not a lot, but it was cheap, so I replaced it for a peace of mind. My cylinder liner got scratched slightly, so I got it replaced too. Why not replace the whole engine when the price to repair is more than half of a new engine? Because I am still waiting to for more flight reports on the new TT redline engine and so there is no point in buying a brand new hyper and just use it for a few gallons.
New vs Old. Note the finish on the new liner. Its suppose to look like that, a bit rough and honed to help the new ring to bed in.
28 gallons haven't worn the con-rod a lot, but replaced it because there was a bit of free-play.MY new hobby-Collecting pistons :( :(

Praying hard that the new piston and ring will last me till I get the redline.

Tuesday, January 1, 2008

Logictech 6100t

This is suppose to be a great gyro and without a doubt, it is. Was told its comparable to the GY611 and since the Gy611 was a lot more expensive at my LHS than pretty much anywhere else in the world, so I ordered this instead.


Its really tiny and light compared to the GY502 I had, yet it still has a LCD screen and buttons for adjusting the parameters. Its just slightly larger than the GY502 sensor and so mounts onto my raptor 50 gyro mounting area with no issus. This is pretty important to me because the raptor hasn't got much electronics mounting area at the front and back then I was running 2x sanyo 1500mah nicd pack and was slightly nose heavy. Servo comes with a metal heatsink casing, which I guess is already standard nowadays. Lighting fast servo at 0.05s. A word of caution though, the included gyro mounting tape sucks. It seems ever so ready to be split apart by a light pull. I am using the 3m white foam tape now. The included servo horn was a round one with un-cut 4arms star shape marking, i.e. it came as a round servo wheel. Maybe its a feature, but who use a round servo wheel on rudder anyway. It was a bit of hassle to cut it myself.

I found the piro to be much more consistent than the gy502 and at slow piro rates, it is actually extremely smooth and slow. With a lower end gyro, I found that slow piros usually ends up choppy and step-like. Piro is extremely fast, sensitive and it holds good. Piro rate is smooth and predictable even in rippers. Holds good even when doing a rolling stall turn. However, the piro I get from this in a K.E flight is pretty inconsistent. Holding ability can be improved though, it does not blow out, just drift slightly occasionally. So far I have only blown the tail once with this gyro and it was because I lost quite a bit of rpm, so it wasn't the gyro's fault.


I have logged 140flights with this thus far and it still is working great with no sign of wear on the servo.

I tried to use this gyro with some other servos and apparently, you cannot use any other servos with this gyro. It worked with the other servos, but the servo was constantly jittering which I think would wear out the servo.


Comes in a nice package.